
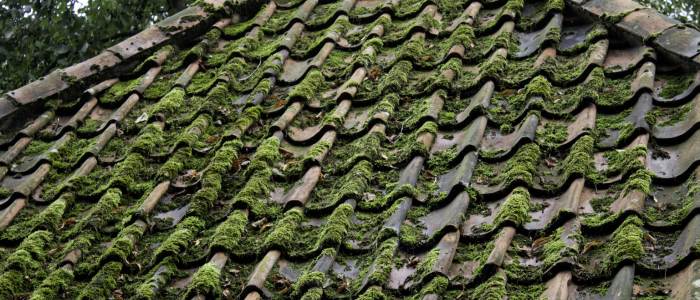
You noticed it a few weeks ago — a patch of green creeping along the north side of your roof. Maybe you thought it looked kind of charming, like a cottage in the English countryside. Let me stop you right there.
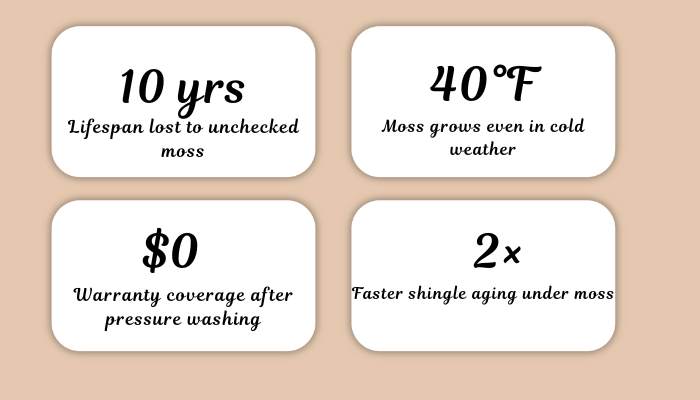
That green is moss. And moss is not your roof’s friend. It’s a slow, relentless destroyer that works silently — trapping moisture against your shingles, wedging its tiny roots into the granule layer, and literally lifting your shingles apart one rainstorm at a time. Left unchecked, a modest moss patch can cut your roof’s lifespan by 10 years or more.
Here’s the other thing homeowners get wrong: they grab the pressure washer and blast it off. That feels satisfying — right up until the roofing contractor tells them they’ve stripped half their granules and voided their warranty in a single afternoon. I’ve seen it more times than I can count.
This guide gives you the correct way to remove moss from your roof — safely, thoroughly, and without doing a single dollar of damage to your shingles. Step by step, from someone who’s been doing this for a living.
Why Moss Is More Dangerous Than It Looks
Moss is a non-vascular plant that thrives in cool, damp, shaded environments — which is exactly what a north-facing roof slope becomes during most of the year. It doesn’t just sit on top of your shingles. It colonizes them. Moss sends tiny rootlike structures called rhizoids into the granule layer of your asphalt shingles, physically loosening the protective coating that keeps UV rays and water out.
Worse, moss acts like a sponge. After rainfall, it holds moisture against your shingles for hours — sometimes days — accelerating the breakdown of the asphalt binder. In winter, that trapped moisture freezes and expands, physically cracking the shingle surface from underneath. This is why heavy moss growth almost always correlates with premature shingle failure and early signs of roof damage.
The good news: caught early, moss removal is a manageable DIY task. Caught late — when it’s thick, established, and covering multiple roof planes — it’s a job for a professional. This guide covers both.
Before You Start
Tools & Products You’ll Need
Getting the right tools before you start saves you time, money, and the risk of accidental shingle damage. Here’s exactly what I recommend based on years of professional moss removal jobs.
Safety Equipment (Non-Negotiable)
- Non-slip rubber-soled shoes — wet moss is extraordinarily slippery. Regular sneakers are not enough.
- Safety harness and roof anchor — if your roof pitch is 6:12 or steeper, a harness is essential.
- Safety glasses — moss treatment solutions can splash and irritate eyes.
- Chemical-resistant gloves — protect your hands from moss-killing solutions.
- Old clothes you don’t mind staining — moss killers will bleach fabric on contact.
Removal Tools
- Soft-bristle brush — long-handled for reaching across the roof safely. Stiff bristles damage granules.
- Garden hose with low-pressure nozzle — for rinsing. Never a pressure washer.
- Pump garden sprayer (2–3 gallon) — for applying moss-killing solution evenly.
- Plastic sheeting or tarps — to protect plants, grass, and garden beds below from chemical runoff.
- Ladder with stabilizers — never lean a ladder directly against gutters.
Moss Removal Products
- Zinc sulfate monohydrate — my go-to professional choice. Effective, widely available, relatively safe for plants once diluted properly.
- Copper sulfate solution — highly effective but more aggressive; keep well away from gutters and waterways.
- Commercial roof moss killers — brands like Wet & Forget, Moss Out, or Bayer Advanced work well and are beginner-friendly.
- Bleach-water solution (DIY) — 1 part bleach to 4 parts water. Budget-friendly but can discolor shingles slightly and must be rinsed carefully. Not my first recommendation.
Do NOT Use These:
Pressure washers (strips granules, voids warranties), wire brushes (tears shingle surface), undiluted bleach (destroys granule bonding agent), and salt solutions (corrodes metal flashing and gutters). I’ve re-roofed multiple homes after homeowners used these on healthy roofs. Don’t make that mistake.
The Process
Step-by-Step Moss Removal Guide
Follow these steps in order. Skipping steps — especially the drying and dwell time — is how people end up with moss that grows back within a season.
Choose the Right Day
Pick an overcast day — not rainy, not blazing hot. Direct sun causes treatment solutions to evaporate before they can penetrate the moss. Avoid windy days that could spray chemicals onto neighboring surfaces. Ideally, pick a day with no rain forecast for 24–48 hours to give your treatment time to work.
Protect Surrounding Plants & Surfaces
Lay plastic tarps or sheeting over garden beds, lawn areas, and any plants directly below where you’ll be working. Wet them down with plain water first — this dilutes any runoff from your treatment solution. Cover painted surfaces on siding or trim that could be splashed. Disconnect and cover your rain barrel if you have one.
Gear Up Completely
Put on your full safety kit before going anywhere near the roof — non-slip shoes, gloves, safety glasses, and harness if your pitch requires it. This is the step most people rush. Don’t. Falls from roofs are serious injuries, and moss-covered surfaces are significantly more slippery than bare shingles.
Dry Brush the Loose Moss First
Using your soft-bristle brush, gently sweep loose moss off the shingles — always working downward, toward the eaves, never upward. Brushing upward can lift shingle edges and break the adhesive bond. You won’t remove all the moss at this stage, and that’s fine. You’re clearing the surface layer so your treatment solution can reach the rhizoids embedded below.
Apply Your Moss Killer Solution
Fill your pump sprayer with your chosen moss treatment — mixed according to manufacturer instructions. Starting at the ridge and working down, apply a generous, even coat across all moss-affected areas. Let it fully saturate the moss. Don’t rush this step. The solution needs time to penetrate and kill the moss at its roots. Leave it to dwell for 20–45 minutes on thick growth.
Let It Work — Don’t Rinse Immediately
This is where most DIYers make the biggest mistake — they apply the solution and immediately wash it off. For products like Wet & Forget, you’re actually supposed to leave them on and let rain do the work over several weeks. For zinc/copper solutions, allow at least 20–30 minutes of contact time. The moss will turn brown and die. That’s exactly what you want to see.
Gently Rinse with Low-Pressure Water
Using a standard garden hose — NOT a pressure washer — rinse the treated areas from the ridge down. Use a gentle flow, not a jet. The goal is to rinse away the dead moss and chemical residue, not blast anything. If moss is still firmly attached, don’t force it. A second application a few days later is far safer than aggressive scrubbing or pressure washing.
Brush Away Dead Moss (After Drying)
Once the roof has fully dried — usually 24 hours — use your soft brush to gently sweep away any remaining dead moss. It should come away easily now that the roots are dead. Again, always brush downward. Collect debris from gutters and downspouts afterward, as dead moss will clog them if left in place.
Apply a Second Treatment If Needed
Heavy, established moss may require a second treatment 1–2 weeks after the first. This is completely normal for moss that’s been growing for multiple seasons. Repeat steps 5–8. By the second application, even stubborn root systems should be fully killed. Attempting to scrub off living moss is far more damaging than being patient with chemical treatment.
Install Prevention — Zinc or Copper Strips
Once the roof is clean, install 6-inch zinc or copper strips along the ridge. Every time it rains, trace amounts of zinc or copper wash down the roof — creating an environment where moss, algae, and lichen simply cannot grow. This is the single most effective long-term prevention strategy available. It’s inexpensive, lasts years, and requires zero maintenance. See the prevention section below for full details.
Pro Tip
The best time to treat moss is early spring or late fall — when moss is actively growing and most receptive to treatment. Treating in midsummer heat causes solutions to evaporate too fast. Treating in freezing temps prevents proper penetration. Timing your treatment right makes a significant difference in effectiveness.
Moss Removal Methods Compared
Not all moss removal approaches are equal. Here’s an honest breakdown of every common method — including which ones to avoid entirely.
| Method | Effectiveness | Shingle Safe? | Warranty Safe? | Cost | My Verdict |
|---|---|---|---|---|---|
| Zinc Sulfate Solution | Excellent | Yes | Yes | $15–$30 | Best DIY choice |
| Commercial Moss Killer (Wet & Forget) | Very Good | Yes | Yes | $25–$50 | Beginner-friendly |
| Bleach/Water Solution | Good | Mostly | Usually | $5–$10 | Use carefully |
| Copper Sulfate Solution | Excellent | Yes | Yes | $20–$40 | Very effective |
| Pressure Washing | Fast (short-term) | No | Voids | $100–$300 | Never recommended |
| Wire Brush / Scraping | Partial | No | Voids | $0 | Damages shingles |
| Professional Treatment | Excellent | Yes | Yes | $300–$800 | Best for heavy growth |
Long-Term Protection
How to Prevent Moss from Coming Back
Removing moss is only half the job. If you don’t address the conditions that caused it, moss will return within 1–3 years. Here’s what I recommend to every homeowner after a moss removal job:
Install Zinc or Copper Ridge Strips
This is the gold standard of moss prevention. A 6-inch strip of zinc or copper sheet metal installed just below the ridge cap releases microscopic amounts of metal ions every time it rains — washing down the roof slope and creating a hostile environment for moss, algae, and lichen. One installation lasts 5–10 years. You can buy pre-cut strips at most roofing supply stores for under $50 for a standard home.
Trim Overhanging Tree Branches
Shade and debris are moss’s best friends. Overhanging branches block sunlight (which naturally kills moss), drop leaves and organic matter that feed it, and keep your roof surface damp for longer after rain. Trim branches so they’re at least 10 feet from the roof surface. This single change can dramatically reduce moss recurrence on north-facing slopes.
Keep Gutters Clean
Clogged gutters back up water at the eaves, creating the damp conditions moss loves. Clean gutters every spring and fall. While you’re at it, check the fascia boards for moisture damage — early rot is much cheaper to fix than the alternative. Read our full signs of roof damage guide for what else to look for during gutter cleaning.
Improve Roof Ventilation
A poorly ventilated attic keeps your roof deck warmer and more humid — exactly the conditions moss prefers. Proper ridge and soffit ventilation not only extends shingle life but also reduces the likelihood of moss colonization. If your home is over 20 years old, have your ventilation assessed. Read our detailed attic ventilation guide for more.
Choose Algae-Resistant Shingles at Next Replacement
Modern algae-resistant architectural shingles contain copper granules built right into the surface — giving you permanent, maintenance-free protection against both algae and moss. If your roof is approaching replacement age, this upgrade costs very little extra but saves significant maintenance effort over the roof’s lifetime.
Pro Tip
Apply a zinc sulfate rinse solution to your roof every spring as a preventive treatment — even if you don’t see visible moss. This keeps microscopic spores from taking hold before they become visible. It takes 20 minutes and costs under $15. That’s the cheapest roof maintenance you’ll ever do.
Know Your Limits
When to Call a Professional Roofer
DIY moss removal works well for light to moderate growth on accessible roofs. But there are situations where calling a licensed roofer is the smarter and safer choice.
Call a Professional When…
- Moss covers more than 25–30% of your roof surface — heavy growth requires professional-grade treatment and equipment to address safely and completely.
- Your roof pitch is steep (8:12 or higher) — steep roofs are genuinely dangerous without professional safety equipment and experience.
- You notice shingles lifting, cracking, or granule loss beneath the moss — moss may be masking deeper structural roof damage that needs assessment first.
- Moss has been growing for multiple years — deep root systems may have already compromised the granule layer, and an inspection will tell you whether treatment or replacement is the better investment.
- You have a metal, slate, or tile roof — these materials require specific treatment approaches that differ significantly from asphalt shingles.
- You’re not comfortable on a ladder or roof — this is reason enough. Roof injuries are serious and often catastrophic. There’s no shame in hiring a professional.
A professional moss treatment typically costs $300–$800 depending on roof size and moss severity — a fraction of what you’d spend on shingle repairs from an improper DIY removal. If you’re unsure, schedule a free roof inspection and get a professional assessment first.
FAQs
Is moss on the roof really that serious?
Yes — more than most homeowners realize. Moss traps moisture against your shingles, physically breaks down the granule layer with its root system, and accelerates shingle aging by 2x or more. It also causes issues behind the scenes — rotting decking, damaged flashing, and compromised underlayment — that aren’t visible until significant damage has already occurred. Treat it early. The cost difference between early and late is substantial.
Can I use bleach to kill moss on my roof?
A diluted bleach solution (1 part bleach to 4 parts water) can work, but it’s not my first recommendation. It can slightly discolor shingles, is harmful to plants and soil if runoff is not managed carefully, and can accelerate corrosion of metal flashing and gutters. Commercial zinc sulfate solutions or products like Wet & Forget are more targeted, gentler on surrounding surfaces, and equally effective.
Why can’t I just pressure wash the moss off?
Pressure washing forces water under shingles, strips the granule layer (your shingles’ UV protection), and can break the adhesive bond between shingles. It also voids most manufacturer warranties. I’ve inspected roofs that looked great after pressure washing but failed within 2–3 years because the granule damage was catastrophic. The short-term satisfaction is not worth the long-term cost.
How long does it take for moss to die after treatment?
It depends on the product. Fast-acting zinc or copper solutions will visibly kill moss within a few days — you’ll see it turn brown and dry out. Products like Wet & Forget work more gradually over several weeks as rain activates the treatment. In both cases, don’t rush to scrub or rinse. Dead moss is far easier and safer to remove than living moss.
How do I stop moss from growing back after removal?
The most effective long-term prevention is installing zinc or copper strip along the roof ridge — these release metal ions with every rainfall, creating a hostile environment for moss. Combine this with annual preventive zinc sulfate rinse treatments, trimming overhanging branches, and keeping gutters clean. If you’re replacing your roof soon, ask about algae-resistant shingles with built-in copper granules.
What’s the difference between moss, algae, and lichen on a roof?
Algae appears as dark streaks or black staining — it’s the most common and least immediately damaging, though it does accelerate granule breakdown over time. Moss is the thick green growth that physically lifts and separates shingles. Lichen is the crusty gray-green growth that bonds chemically to the granule surface — it’s the hardest to remove and the most damaging. All three respond to zinc/copper treatments, but lichen often requires multiple applications and professional attention for heavy infestations.
Final Thoughts
Your roof doesn’t fail overnight. It sends warnings weeks, months, sometimes years before it gives out. The difference between a $400 repair and a $15,000 replacement almost always comes down to one thing — how early you paid attention.
Moss is one of those warnings. It looks harmless, it grows slowly, and it’s easy to put off dealing with it. But every season you leave it untreated, it digs a little deeper, holds a little more moisture, and takes a little more off the lifespan of your shingles.
The good news is that moss is one of the most manageable roof problems you’ll face — if you catch it early and handle it correctly. No pressure washing. No wire brushes. No shortcuts. Just the right chemical, applied the right way, followed by a zinc strip and a little seasonal attention.
Do it right once, maintain it annually, and moss won’t be a problem again. And if it’s already beyond what you’re comfortable tackling — call a licensed roofer. Your roof is worth protecting. And so is your Saturday afternoon.